How to Create Digital Resources: Instruction Card (Part 5)

Having an instruction card as the start of your digital resource makes it look really professional.
It also helps you save space on the rest of your task cards because you don’t have to repeat the instructions if you don’t want to.
Creating the Instruction Card
1. Start from template
At this point, I’m convinced that at least 80% of any TpT resource you create, you should start from a template. If you don’t have a template for whichever portion you are creating, create the template first!
What goes into the Instruction Card:
- Activity Title
- Directions
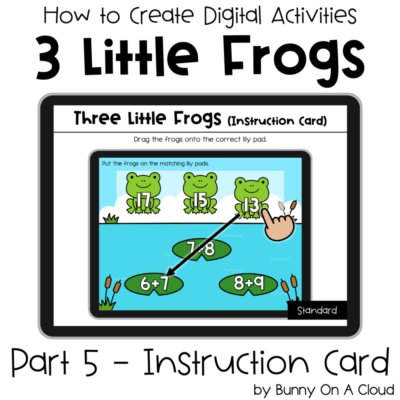
- iPad mock up (I didn’t use a real mock up, just an almost-real looking iPad frame)
- Standards, if any
Name the PowerPoint file something that makes sense, like “3 Little Frogs – instruction card”.

2. Build a custom ‘screenshot’ of your activity in the iPad frame
You can use an actual screenshot, or you can build one with all the pieces you have.
What goes into the ‘screenshot’:
- Flat background (created in Part 1)
- Movable Frogs
- Arrow (especially for drag and drop activities)
- Hand clipart (from my Instruction Icons set)

3. Add the activity title and directions
Type the activity title and directions over the placeholder text, and add a standard if it applies.
Add in your store name and copyright too, then that’s about done.

4. Export as PNG/PDF
Export as PDF if you are creating for TpT Easel, and export as PNG (setting the width to 1600px) if you are creating for Boom Cards and Google Slides.
For more help on exporting, see my PowerPoint Notes on Exporting and Securing.

Adding the Instruction Card to TpT Easel
1. Add Page
Click ‘Add Page’ at the bottom left corner and choose ‘Upload’.
Then select the PDF you have exported in the previous section to upload.

2. Drag the slide thumbnail up to become the top page
Drag the Instruction Card slide up to become the first page.

Adding the Instruction Card to Boom Cards
Boom Cards have the superpower of shuffling the cards at every play, so that even if a student plays the same deck multiple times, it’s still different each time.
That means there’s an extra step to make sure the Instruction Card doesn’t get shuffled in.
1. Choose ‘New Card from Image’

2. Upload the Instruction Card PNG
Upload the Instruction Card PNG created in the earlier section and select it. Make sure it becomes the first card of your Boom Deck. If it isn’t, just drag it up.

3. Click on Details
The “Details” button is found at the top blue toolbar. Click on that.

4. Don’t shuffle the first card
Under Deck Details, go to the “Play” Tab.
The default play mode is “Randomize”, which means the cards in the deck will be served up to students in a different order every time they play the Boom Cards.
To prevent the Instruction Card from being shuffled in, indicate under that section “Don’t shuffle n[1]”. That means the Card no. 1, i.e. the Instruction Card won’t be shuffled in with the rest of the cards.

Adding the Instruction Card to Google Slides
1. Insert blank slide at the top
Right click in the slide thumbnails area to add a new slide. Make sure it become the very first slide, or just drag it to the top.

2. Add background image
Add a background image by clicking on “Background” in the sub toolbar, just like we did in Part 4.

3. That’s it!

Next Steps
The step after this would be Part 6, creating the cover image.


