How to Create Digital Learning Resources: Fill in the Blanks (Part 1 – Preparations)

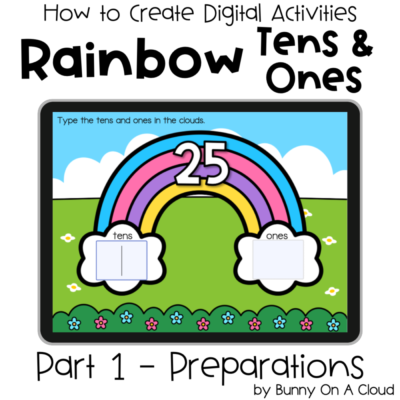
In my 3rd digital resources tutorial, we are gonna create a Place Values activity called Rainbow Tens and Ones. This will be a great activity for 1st Grade Math.
Check out my other digital resources tutorials like 3 Little Frogs (Addition to 20) and Digging for Sight Words. Each of these activities explore a different mechanism through which to create digital resources. In this resource, we are going to use fill in the blank.

Planning the Activity
1. Determine Target Skills and Grade Level
Grade Level: 1st
Target Skill: Place Values (Tens and Ones)
Activity Type: Fill in the blank
No. of Task Cards: 7 (Most decks in the marketplace typically have between 20-30 cards. This is created just for demonstration so it’s shorter.)
2. Exact Details/Rigor
Next, plan down to the exact numbers you want to use on each question/slide. In that way, when you start creating, you don’t have to pause and figure out what comes next.
So the 7 numbers I’m going to use are: 25, 42, 67, 51, 29, 83, and 47.
Work on the Theme/Design
1. Slide Size
Set up your slide size before doing anything else. (For more details on this, check out my PowerPoint Notes on Working with Slides.)
I’m using 4:3, but there are 3 main sizes you can choose from:
- 10 in x 7.5 in (that’s 4:3 i.e. Standard Size)
- 16:9 (this is popular)
- 7 in x 5 in (recommended Boom Card size)
2. Main Clipart
In this activity, we can get inspiration from Part Part Whole, from How to Use Clipart.
I’m going to use the rainbow clipart from Rainy Day Kids. The number for each question will be on the rainbow, while students type into the clouds.
Since we are only using 1 main piece of clipart, we can make it big to fill almost the entire slide.

3. Add Text
For the big numbers, use a thick font and add text outlines. You also can add drop shadow to make it stand out even more. In this case, I’m using Happy Titles font at size 170.
For the text labels inside the clouds, I’m using Happy Paragraphs at size 28.
You can find both of these fonts in my Build A TpT Store Fonts and Clipart Starter Pack.

4. Add Background/Border/Design
In this example I added a spring-themed background to match the rainbow.
You can also use doodle borders, background colors, textures, or even just leave the background empty as is.

5. Add Details (if any)
You can consider adding a text box for directions, and another text box for your copyright.

Create the Parts
There are no movable pieces in this activity, so all we need to do is to create the flat backgrounds for each digital task card.
There will be 7 flat backgrounds for this activity, one for each task card.
Creating the flat backgrounds
- Copy and paste the slide design into a separate PowerPoint file
- Duplicate that first slide to get 7 slides in all.
- Change the big number on the rainbow according to what you planned in section 1 (25, 42, 67, 51, 29, 83, and 47).

Export the Parts
Since we have no movable pieces for this digital activity, we only need to export the flat backgrounds.
Export as PDF (for TpT Easel)
To create for TpT Easel, export the backgrounds as PDF (File > Export). PDF is already selected as the default file format.

Export as PNG (for Boom Cards or Google Slides)
Export the backgrounds as JPEG/PNG (you have to change the file format selection). Also select the ‘Save every slide’ button. Set the export width to at least 1600px.

Next Steps
Now that the flat backgrounds have been created, it time to put the activity together on a digital platform. Here are 3 options:


